Introduction
You pour time and energy into creating engaging social media content, but is it accessible to every person in your audience? By implementing a few simple changes, you can ensure people with disabilities can experience your posts as intended. This guide walks you through the essential steps to make your content truly inclusive.
Social Media Accessibility Series
Part 1: How Does Each Platform Measure Up?
Part 2: How to Make Your Social Media Content Accessible
Part 3: How to Make Your Social Media Videos Accessible (Step-by-Step Guide)
Part 4: Is Social Media Accessible? Three Disabled Users Share Their Experiences
Part 5: Video Accessibility on YouTube and Vimeo
Is everyone in your target market able to access that clever, well-planned content? Can people who are blind or visually impaired access your images? Is your content understandable when read by a screen reader? Keep reading to learn how to make your social media content and images fully accessible so you can rest assured you’re not leaving anyone out.
Does the following describe you? You put energy, thought, and loads of time into crafting your social media presence and strategy. You think about everything, from the colors and graphics to the hashtags and the trends you join in on.
Or perhaps this is more you: You manage the social media for your company or your clients, and you want to make sure they are getting the most bang for their buck, so you brainstorm and ideate, and craft copy for every TikTok, ad, and post until you get it just right.
If either of those describes you, we have one question: Is everyone in your target market able to access that clever, well-planned content? Can people who are blind or visually impaired access your images? Is your content understandable when read by assistive technology like a screen reader? If the answer is, “I don’t know,” do you know how to find out?
Whether you’re an influencer, a content creator, a digital marketer, or just someone who wants to include others wherever and however possible (if so, go you!), keep reading to learn how to make your social media content accessible so you can rest assured you’re not leaving anyone out.
How to Write Social Media Content That’s Accessible
Many social media users utilize screen readers to access content, but screen readers can’t decipher and filter information like the human brain does. The following will make your content more accessible in general and screen reader-friendly.
1. Format Hashtags Properly
Nothing like a real-world fail to illustrate why proper formatting matters for hashtags: #susanalbumparty. What words stand out to you there? Yeah, it’s not good.
To avoid this embarrassing mishap, make sure to use capital letters in compound hashtags. This can be accomplished by putting a hashtag in Camel Case or Pascal Case. Pascal Case is also referred to as Title Case. Instead of #susanalbumparty, write #SusanAlbumParty. Much easier to read, right?
- A hashtag in Camel Case #looksLikeThis, with the first word in all lowercase and then the first letter of each subsequent word capitalized.
- A hashtag in Pascal Case or Title Case #LooksLikeThis, with the first letter in each word of the hashtag capitalized.
Either formatting will make a hashtag accessible. Lowercase and uppercase letters help a screen reader identify separate words, allowing it to pronounce the hashtag correctly. Proper formatting also makes hashtags easier to read and understand for everyone, even if they don’t have a vision disability.
2. Avoid All Caps
Screen readers read all caps differently (and sometimes quite poorly), so use normal letter case whenever possible. Plus, there’s rarely a need to shout at everyone.
3. Use Emojis Instead of Emoticons and Use Them Sparingly
Emoticons like :-) just look like jumbles of punctuation to screen readers, which is why emojis are preferred because they have assigned descriptions attached to them. When an assistive device comes across an emoji, the icon’s assigned description will be what the device reads aloud to the user.
However, an emoji’s description may not always convey the meaning you want, so use a text-to-speech program like Apple VoiceOver or Android TalkBack to check them first, and only use a few. You can also visit emojipedia.org to see the various appearances and descriptions of emojis across different platforms, devices, and browsers.
4. Don’t Use ASCII Art
ASCII art is a design technique that uses letters, numbers, punctuation, and other characters from the American Standard Code for Information Interchange (ASCII) to make illustrative pictures. Think of it like an advanced version of emoticons. ASCII art is often used on social media to create topical memes and sometimes even used by established brand accounts.
Unfortunately, ASCII art illustrations are not accessible for anyone using a screen reader or text-to-speech program, and digital marketers and content creators should not use them in their content if they want to remain inclusive.
Assistive devices are programmed to read characters and punctuation marks as they were originally intended. They cannot properly discern when characters are used to create illustrations, so ASCII art can result in a confusing message when read by a screen reader.
5. Write Alt Text
Every image conveys meaning, but it’s often inaccessible to people with disabilities. Alt text helps unlock that information, so incorporate it into your writing process. Keep reading to learn more about alt text later in this post.
6. Put Hashtags and Mentions at the end
Punctuation marks like @ and # are read aloud by screen readers, so keep in mind how they might interrupt your copy.
7. Write in Plain Language
Jargon, slang, and technical terms should only be used when appropriate. Screen readers have a hard time reading them, and they can also be confusing for non-native English speakers or those with learning disabilities.
8. Avoid Special Characters
Seriously, check out this tweet to see why special characters are awful for screen readers. Then just don’t use them.
9. Use Inclusive Language
Stick to gender-neutral pronouns, avoid ableist language, and evaluate your copy for assumptions and biases.
How to Make Social Media Images Accessible
Thankfully, most images can be made accessible by doing two simple things:
- Checking your image’s color contrast if it contains words.
- Write alt text for them.
Check Color Contrast
Color contrast is important because it ensures that your text is legible. Whether you’re putting text over an image or just on a colorful background, always check color contrast. A simple tool for doing this is the Background Image A11y Checker.
Simply upload your image, add your text, and change its color, then watch as the meters change color. If you don’t pass, try moving the text around the image to see if that improves the contrast. You can also try changing your text’s color or the background image, though it doesn’t give you the option to change the background color of the text.
You’ll notice that the tool mentions AA and AAA compliance. To learn more about what these levels mean, check out the Web Content Accessibility Guidelines (WCAG) on the W3C website.
Write Alt Text
Alternative (Alt) Text is simply a brief description of an image, and it doesn’t need to be overly complicated. Just think through the information you want users to gather from the image and the order in which you want them to gather it. Then write your description in that order, being descriptive when it’s important to the image.
A simple rule of thumb here is to give the image the length it needs while trying not to be excessive. Imagine listening to a lengthy image description that describes every little detail when most details aren’t crucial to the meaning of the image. Ain’t nobody got time for that!
For an in-depth tutorial on writing alt text, check out our Alt Text Masterclass blog series.
Note: Some platforms use AI to generate descriptions for images if you don’t add them yourself. Don’t give in to the temptation to rely on this! AI gets it wrong a lot, sometimes offensively so, but usually it’s just an incredibly unhelpful description, defeating the purpose of alt text altogether.
Pro-tip: If you have a more complicated image, like an infographic or art, it will need a lengthier description to fully capture the meaning. If that’s the case and it won’t fit within a platform’s character limits, consider using the caption. Simply write, “Image description:” and then insert your description.
How to Add Alt Text on Social Media
Sadly, this is where things can get complicated. Most social media platforms allow users to manually write custom alt text in some capacity, even newer sites like Threads and Bluesky. However, the experience varies between platforms and even devices, as not every site allows users to access the alt text field on desktop and mobile.
On top of that, image accessibility features vary across third-party management tools and apps like Buffer and Hootsuite, but most can access the alt text fields for Facebook, X/Twitter, and LinkedIn at the very least. Some third-party sites, like Sprout Social, have an API integration for alt text on Instagram and Threads, but you should check with your rep for the management system you use to see which platform alt text fields it can access.
If you use a management system that cannot access the alt text field for a specific platform, write your image description in the caption area of your post or schedule posts directly through the respective sites.
Facebook – Desktop
How to add alt text on the desktop version of Facebook:
- Click Edit in the upper left corner of an uploaded image before publishing a post.
- Select Alternative Text from the listed options in the Photo Detail window.
- Write alt text in the provided field.
- Click Save.
Facebook – Mobile
How to add alt text on the mobile version of Facebook:
- Click the three dots in the upper right corner of the uploaded image.
- Select Edit Alt Text from the menu of options that appears.
- Write alt text in the provided field on the next screen.
- Click Done.
Instagram - Desktop
How to add alt text on the desktop version of Instagram:
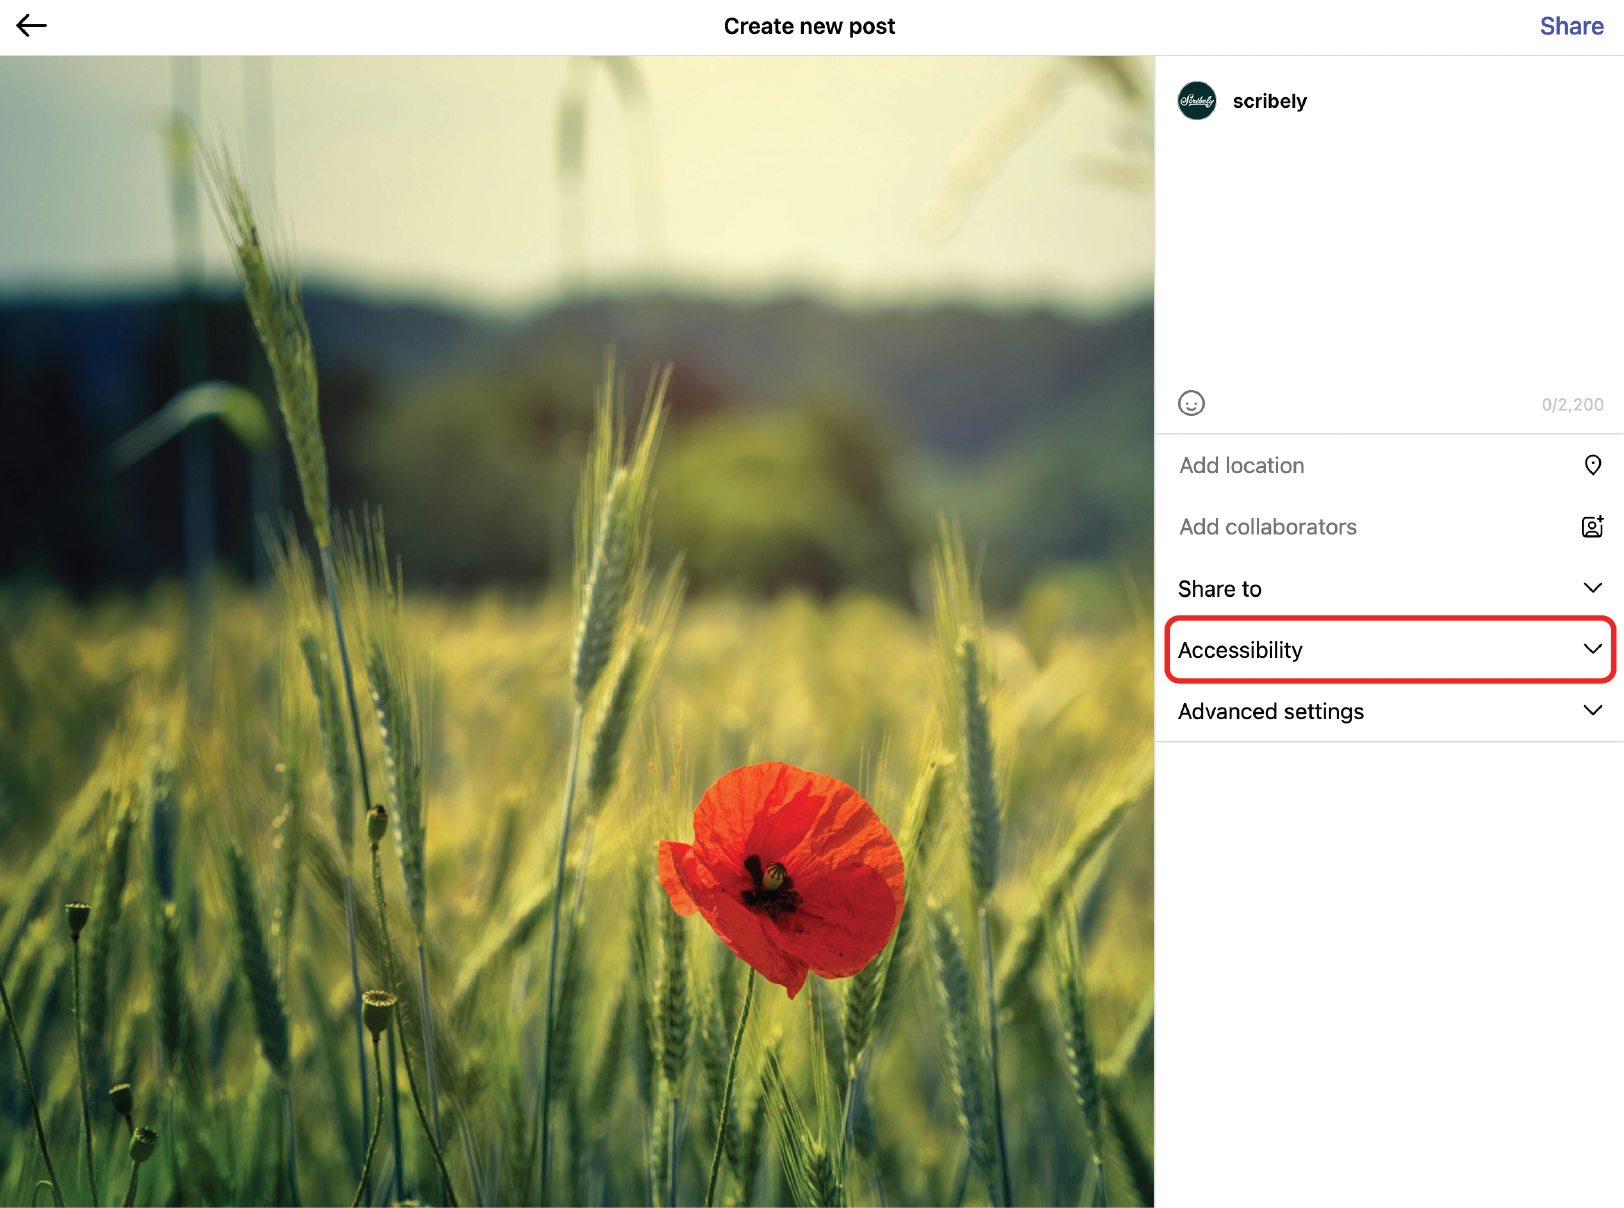
- Expand the Accessibility accordion just below the caption area on the final publishing screen.
- In the expanded view, write alt text in the provided field.
Instagram – Mobile
How to add alt text on the mobile version of Instagram:
- Scroll down and click More Options near the bottom of the final publishing screen.
- Click Write Alt Text on the next screen.
- Write alt text in the provided field.
- Click Done.
Meta Business Suite (formerly Creator Studio)
Alt text can only be added through the desktop version of Meta Business Suite. There is no alt text field in the mobile app. Meta Business Suite is only available for Facebook pages and Instagram professional accounts. It cannot be used for personal Facebook profiles or Instagram accounts.
How to add alt text through the desktop version of Meta Business Suite:
- After uploading an image, click the pencil button to the right of the thumbnail in the Media section.
- Select Alt Text from the menu of options that appears.
- Write alt text in the available field.
- Click Apply.
NOTE: many users have reported a glitch where they write alt text for posts in Meta Business Suite, but the image descriptions do not ship with the published posts. Make sure to double-check any posts published via Meta Business Suite to avoid this issue.
LinkedIn – Desktop
How to add alt text on the desktop version of LinkedIn:
- After uploading an image, click the ALT button below the image.
- Write alt text in the provided field on the next screen.
- Click Add.
LinkedIn – Mobile
How to add alt text on the mobile version of LinkedIn:
- After uploading an image, click the ALT button below the image.
- Write alt text in the provided field on the next screen.
- Click Done.
X/Twitter – Desktop
How to add alt text on the desktop version of X/Twitter:
- Click Add Description under the uploaded image.
- Write alt text in the provided field on the next screen.
- Click Save.
After alt text is added to an image, the description will appear under the image in the post composition window, and an alt text label will also be shown in the bottom left corner of the image.
X/Twitter – Mobile
How to add alt text on the mobile version of X/Twitter:
- Click the +ALT button in the lower right corner of an uploaded image.
- Write alt text in the provided field on the next screen.
- Click Done.
After writing an image description, the button on the image in the composition window will say ALT instead of +ALT to indicate that alt text has been added.
Pinterest – Desktop
Pinterest’s alt text field is only available on desktop. There is no alt text field on the mobile app, and an image description cannot be added retroactively to someone else’s pin before sharing it to a board, only new images that are uploaded directly to the platform.
How to add alt text on the desktop version of Pinterest:
- After uploading an image to create a new pin, expand the More Options accordion near the bottom of the screen.
- Write alt text in the provided field that appears.
TikTok – Mobile
It is not currently possible to add alt text to images on the desktop version of TikTok. Images will need to be uploaded with alt text in the mobile app.
How to add alt text on the mobile version of TikTok:
- On the final publishing screen for a static photo post, click More Options near the bottom.
- Select Add Alternative Text from the listed options that appear.
- Write alt text in the provided field on the next screen.
- Click Done.
Threads – Desktop
How to add alt text on the desktop version of Threads:
- After uploading an image, click the three dots in the lower left corner of the image.
- Select Add Alt Text from the menu of options that appears.
- Write alt text in the provided field on the next screen.
- Click Done.
Threads – Mobile
How to add alt text on the mobile version of Threads:
- After uploading an image, click the three dots in the lower left corner of the image.
- Select Add Alt Text from the menu of options that appears.
- Write alt text in the provided field on the next screen.
- Click Done.
Bluesky – Desktop
How to add alt text on the desktop version of Bluesky:
- Click the +ALT button in the upper left corner of the uploaded image.
- Write alt text in the provided field on the next screen.
- Click Save.
After adding alt text to an image, the ALT button on the image in the composition window will include a checkmark instead of a plus sign to indicate that alt text has been added. This change also occurs on the mobile version of the platform.
Bluesky – Mobile
How to add alt text on the mobile version of Bluesky:
- Click the +ALT button in the upper left corner of the uploaded image.
- Write alt text in the provided field on the next screen.
- Click Save.
Snapchat
Snapchat does not have an alt text field as of this writing, so it’s not possible to make your images accessible on that particular platform.
Additional Platform Notes
Alt text can also be added to GIFs on X/Twitter, Threads, and Bluesky when the GIF comes from the respective platform’s built-in GIF library. This can be done on the desktop and mobile versions of all three platforms.
Typically, alt text is only for image files like JPGs, PNGs, and GIFs. However, Threads and Bluesky both allow users to add alt text to videos, but this is usually known as a written video description, alt text. Treat alt text for videos the same as alt text for images and describe the key visual details and actions of the featured media.
Several platforms have character limits for their alt text fields. Known character limits include:
- Bluesky: 2,000 characters
- LinkedIn: 1,000 characters
- Pinterest: 500 characters
- TikTok: 300 characters
- X/Twitter: 1,000 characters
If a Facebook image description is a little long, the platform may show a warning that recommends making the alt text less than 100 characters. This warning can be ignored. Alt text should be as long as needed to make an image accessible.
A Little Effort Can Make a Huge Difference
By adding the steps above to your workflow, you’ll quickly and dramatically improve the accessibility of your social media content, and you’ll see just how easy it is once you’ve gone through the process a few times. Above all, you’ll ensure that all the effort, brainstorming, time, and—let’s be honest—tears that you put into your content will shine, for everyone.
Check out the rest of this blog series to keep learning more about accessible best practices for social media. Part 3 dives into how you can level up your social media even further by making your video content accessible!

Check out Scribely's 2024 eCommerce Report
Gain valuable insights into the state of accessibility for online shoppers and discover untapped potential for your business.
Read the ReportCite this Post
If you found this guide helpful, feel free to share it with your team or link back to this page to help others understand the importance of website accessibility.


.jpg)


.jpg)


_edited_6x4-p-1080.jpeg)


