

Introduction
We all know that good content can be the difference between a brand racing ahead of the competition or crashing and burning. We also know that when it comes to social media right now, it’s video content specifically that can quickly propel a brand forward. Yes, there’s still a time and place for other types of content, but if video isn’t part of your social media strategy, you’ll hit major roadblocks. Yet here’s what savvy brands and content creators alsounderstand: accessible content—that is, content that uses several different ways of communicating information to ensure that everyone can access it—is the real accelerator. You can invest your time, resources, and marketing budget into creating fabulous content of every type, but if large segments of your target market can’t access it, your ROI—and your brand’s reputation—is taking a huge hit. So how do you make your social media video content accessible. Keep reading to learn step-by-step how to ensure all those clever TikToks and video ads that you agonized over are going the distance.
Social Media Accessibility Series
Part 1: How Does Each Platform Measure Up?
Part 2: How to Make Your Social Media Content Accessible
Part 3: How to Make Your Social Media Videos Accessible (Step-by-Step Guide)
Part 4: Is Social Media Accessible? Three Disabled Users Share Their Experiences
Part 5: Video Accessibility on YouTube and Vimeo
Is everyone in your target market able to access that clever, well-planned content? Can people who are blind or visually impaired access your images? Is your content understandable when read by a screen reader? Keep reading to learn how to make your social media content and images fully accessible so you can rest assured you’re not leaving anyone out.
Does the following describe you? You put energy, thought, and loads of time into crafting your social media presence and strategy. You think about everything, from the colors and graphics to the hashtags and the trends you join in on.
Or perhaps this is more you: You manage the social media for your company or your clients, and you want to make sure they are getting the most bang for their buck, so you brainstorm and ideate, and craft copy for every TikTok, ad, and post until you get it just right.
If either of those describes you, we have one question: Is everyone in your target market able to access that clever, well-planned content? Can people who are blind or visually impaired access your images? Is your content understandable when read by assistive technology like a screen reader? If the answer is, “I don’t know,” do you know how to find out?
Whether you’re an influencer, a content creator, a digital marketer, or just someone who wants to include others wherever and however possible (if so, go you!), keep reading to learn how to make your social media content accessible so you can rest assured you’re not leaving anyone out.
How to Make Social Media Videos Accessible
Making videos accessible is more involved than making images accessible simply because it involves more senses. Meaning is conveyed not just through images, but also sound, speech, words on the screen, facial expression, body language, color…the list goes on. How do we convey that meaning for people with auditory disabilities, as well as for individuals with visual or cognitive disabilities? There are several different steps to take, which are broken down below by platform.
1. Written Video Descriptions
Written video descriptions make a big difference, are super easy to do, and won’t take much time. Simply use the caption to briefly describe what’s happening in the video. No need to get complicated or spend a ton of time, just think about how you would describe this to someone over the phone and write that down.
Tip: The caption is also a good place to add any warnings about flashing lights, strobe effects, or other video sequences that might trigger seizures.
TikTok, Instagram, Facebook, LinkedIn, and YouTube
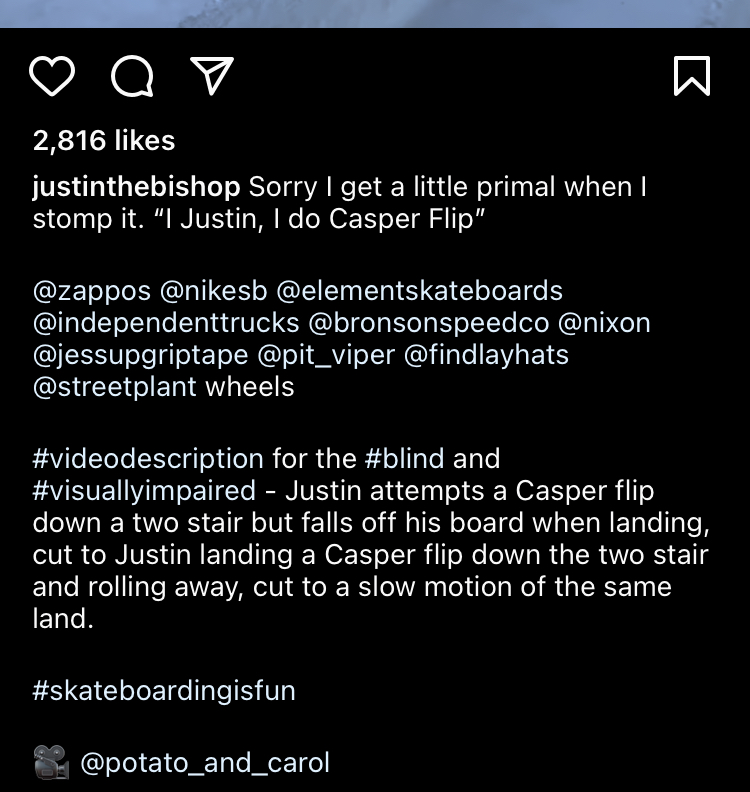
On the screen where you insert your caption, simply add your description to the end before any hashtags, as seen in this caption for a Reel of blind skateboarder Justin Bishop @JustinTheBishop (and don’t forget to use camelCase or PascalCase for your hashtags!) Like with alt text, you want to make sure your video description includes the key visual details and actions in your media.
This method is also applicable to YouTube videos. The field labeled “description” on the platform is essentially YouTube’s caption area, and you can add your video description there.
A second option for Instagram is to put your video description in a comment, pin the comment so it doesn’t get buried, and mention in your caption where to find the description.
With this tactic, make sure to be mindful of the character limits that each platform has for their different fields. If your video description is going to be too long for a field, the next method may be a better option for you!
X/Twitter is more difficult because of the character limit. It’s recommended to include a link to a transcript, summary, and/or description in every video post. If you go with this method, the easiest way to do this is to create a Google doc with your description, then set link sharing on the document to “View Only” and include that link in your post.
Another method would be to include a link to an accessible version of the video, meaning one that includes closed captions, a transcript, and audio description. If you choose this method, make sure to leave room in your post for the link and its description, e.g. “Accessible version: [link].”
Threads and Bluesky
Like X/Twitter, Threads and Bluesky have character limits. However, both platforms have tried to go the extra mile when it comes to video accessibility and allow users to write descriptions for their media. This can be a little deceptive, though, because the video description feature on Threads and Bluesky is labeled as “alt text” like it is for images.
To be clear, alt text is only for images like JPG, PNG, and GIF files. A description for a video is simply called a written description, not alt text.
Despite the mislabeling, it’s okay to use the feature for your videos on Threads. Describe the key visual details and actions in your media just like you would if you were writing your video description in the caption area of your post.
On the other hand, the video description feature on Bluesky shouldn’t be used yet. As of writing this, it’s been reported by many people that their assistive devices cannot properly access the video description assigned to media on the platform. If you want to make your videos accessible on Bluesky, stick to the method used on X/Twitter to write video descriptions.
2. Captions/Subtitles
Thankfully, captions are starting to become the standard, mostly because they’ve been in use for so long and many people prefer watching videos with sound off.
All videos with audio should have captions. Even if your video doesn’t have words, the relevant audio needs to be captioned. This section covers tips for making your captions effective, the different types of captions, and how to add them on each platform.
What Makes Captions Effective
Before we get into the technical bits, it’s important to know the difference between good and bad captions. Not all captions are created equal and simply adding them doesn’t necessarily make your videos accessible. They need to actually be usable, which requires keeping a few things in mind.
- Readability. If you can’t read them, what’s the point? Pay attention to the size, font, color, and background.
- Accuracy. Whether you write your own captions or use auto-captions, if they’re not accurate, your viewers aren’t getting the information you want. Auto-captions (see below) often aren’t accurate, so if you use them, take the time to edit them for accuracy.
- Synchronization. If captions don’t sync with a video’s audio, it’s obvious and confusing.
As our friend Meryl K. Evans points out, there are other rules for making captions great, but if you don’t follow these three, the rest don’t matter. Check out her article for a more in-depth explanation of how to make your captions as user-friendly as possible.
The Difference Between Captions and Subtitles
Though captions and subtitles both refer to written words on the screen and are often used interchangeably, they are different.
There are two types of caption formats: open and closed.
Open captions are permanently embedded into a video during post-production and always visible. They cannot be turned off, moved, or resized. Open captions are sometimes referred to as burned and embedded captions as well.
Closed captions can be toggled on and off based on the preferences of the viewer. They can also be moved and resized. If you’ve ever noticed a button labeled “CC” in video player controls, that’s for closed captions. Most mainstream streaming services offer closed captions as do many social media platforms now.
Auto-captions are simply closed captions that were generated automatically by an algorithm or program, rather than by a human. Some platforms will promote their ability to add auto-captions to videos, but much like auto-generated alt text, auto-captions aren’t usually very good and should not be used for your final captions. Edit auto-captions whenever possible.
Reels and TikTok actually have both open and closed captions. Users can add their own text to videos as captions, and if they do, they can’t be turned off by users (see Image 1 below). There’s also the option to add auto-captions when uploading a video, which can be turned off by users in their settings or on each video, thereby making them closed captions (see image 2 below).
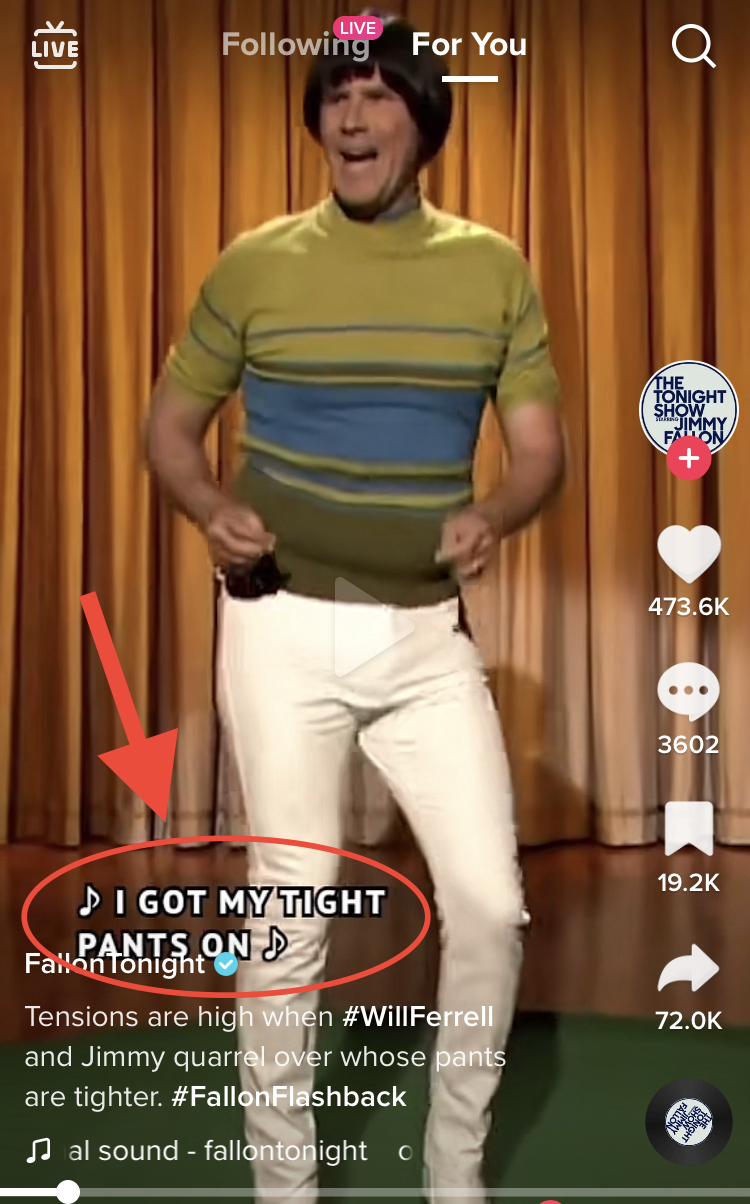
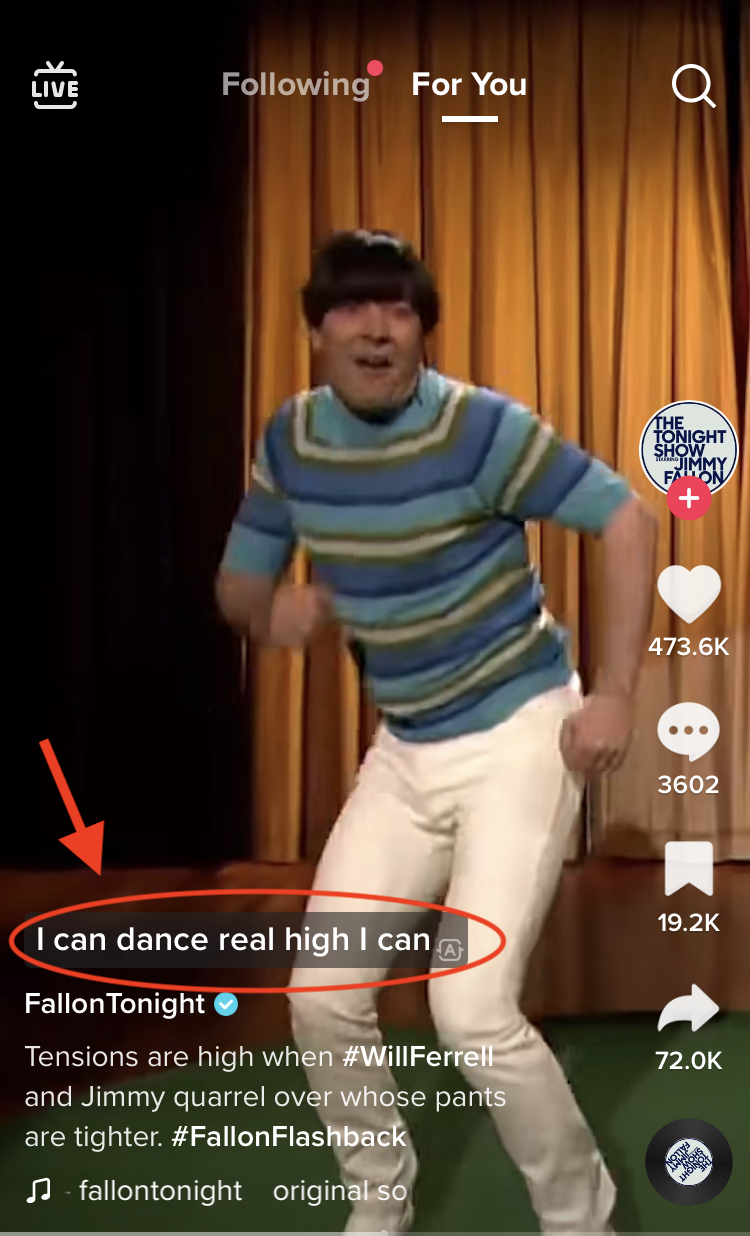
As you can see from the images above, Fallon Tonight chose to add both open and closed captions to their video. If you choose to add both, keep in mind where TikTok and Reels auto-captions are displayed when choosing where to place your open captions.
If you’re trying to decide between using closed or open captions, choose closed. They offer a more customizable experience for viewers in terms of visibility, position, and size, so they are the preferred option. Open captions should really only be used when closed captioning isn’t available or if a platform’s automatic captions cannot be edited.
Subtitles are a form of caption that convey the dialogue in a different language from the one being spoken. For example, Netflix’s Squid Game was recorded in Korean but became a global phenomenon in part thanks to having subtitles in 31 other languages.
Subtitles are typically provided in the same way that closed captions are, where a viewer can toggle them on or off. However, some forms of media will provide subtitles as open captions if there are moments where a different language is briefly being spoken.
In Disney’s 2023 production Peter Pan & Wendy, indigenous Canadian actress Alyssa Wapanatâhk played the native princess Tiger Lily. She occasionally spoke Cree on screen, an indigenous language. When she did, open subtitles would appear on the screen and translate the dialogue into English, regardless of whether the viewer had closed captions turned on or not.
What’s an SRT file?
Though auto-captions are quick, they can often be wrong, and not everyone takes the time to edit them before they post. Thus, some platforms have opted not to use them, instead giving users the option to upload SRT files.
SRT—or SubRip Subtitle—files are simple text files that add timestamps to your captions so that they are synchronized with your video. Because they are separate text files, you have the ability to edit them before uploading, which allows you to ensure the accuracy of your captions and their timing. Check out this post from Hubspot for detailed instructions on creating and editing an SRT file.
How to Add Captions to Your Social Media Videos
Use the links below to follow each platform’s instructions for adding captions to your videos. Some have built-in captioning capabilities while others require users to upload SRT files with their videos.
Threads and Bluesky do not currently have in-app captioning capabilities for videos, nor can you upload an SRT file with your videos. Any videos uploaded to those platforms will need open captions added to them beforehand.
When uploading an SRT file to a video on Facebook, make sure to use the proper naming convention for your file. It should also be noted that many of the platforms will automatically create auto-captions for videos if captions aren’t created manually or uploaded with the video, so be sure to edit them when possible.
3. Audio Description / “Voiceover”
Audio description is essentially like podcasting: it conveys all pertinent information audibly instead of visually. And the bonus of doing an audio description over a transcript (see next section) is that a person with a vision disability gets a break from listening to Siri!
A traditional audio description adds an additional audio track to a video that can be toggled on and off by supported platforms. Audio descriptions are an accessible option on popular streaming services like Netflix and Disney+ when a production team has opted to add them to media. When available, they are typically housed under the same menu as captions and subtitles.
Tip: If you’ve never watched something with audio description, check out Netflix’s Audio Description section to get a feel for it.
Adding audio description to your social media videos can feel awkward at first but becomes second nature the more you do it. Again, think about how you’d describe what’s happening on screen to someone over the phone. The key is to describe the crucial details and actions happening in a video and, if possible, add it in only during pauses in dialogue.
Tip: If your video doesn’t have enough breaks or pauses for audio descriptions, then create a second version of your video that adds in breaks for the descriptions and simply call it the same title + “Audio Described.” Your followers will quickly become accustomed to this and only watch their preferred version.
While it’s not possible to upload multiple audio tracks with social media videos, adding an audio description to a video is still possible through narration. As of this writing, you can add audio descriptions to your TikToks and Reels using the platforms’ respective voiceover features, which allows you to record narration as the video plays. Just be aware that viewers will not be able to turn the voiceover off like they would be able to with a traditional audio description. Check out this guide for TikTok and this guide for Reels to learn more about voiceover.
It’s not currently possible to natively add audio descriptions on LinkedIn, X/Twitter, Facebook, Threads, or Bluesky videos. You’ll need to utilize third-party software to do this before uploading to any of these platforms. If you're creating a secondary audio described version, you will need to link out to it and provide instructions in your caption.
4. Transcripts
Transcripts are another way to make a video accessible to someone with visual impairments. If they prefer not to listen to audio description, they can download the transcript and listen to it via a screen reader or read it on a refreshable braille display. For everything except TikTok and Instagram, this means simply adding a link to a PDF or Google doc into the text of your post/tweet.
For Instagram and TikTok, because they don't allow clickable links in captions or comments, you’ll have to use the link in your bio/profile. (Note: On TikTok, this option is only available for business accounts.) Make sure you mention in your captions where to find the transcript as well.
Tip: This works best when you utilize a tool like LinkTree or have a landing page on your website specifically for a list of links. Simply add a link to each transcript to your LinkTree every time you upload a new video.
Conclusion
We suspect that the main reason more people don’t already make their social media videos accessible is because of a lack of awareness, and that those who are aware of web accessibility don’t do it because of the extra time investment. That’s a valid concern because it does take more time than not making them accessible (especially since social media companies have been reluctant to build accessibility into their platforms).
But we also suspect that it’s a “missing the forest for the trees” kind of situation—that is, the con of time overshadows all the pros. So, let’s break it down.
Cons of Making Videos Accessible
- It takes more time.
Pros of Making Videos Accessible
- Improves brand reputation.
- Removes barriers.
- Includes everyone.
- Unlocks a bigger audience.
- Can increase ROI.
- Eliminates possibility of being sued for lack of accessibility.
The moral of the story is: the only thing you have to lose is time, and you have everything to gain by making your social media videos accessible. Time to get to work!
Check out Part 4 of this Social Media Accessibility series.

Image Description
Image Description Goes Here
Check out Scribely's 2024 eCommerce Report
Gain valuable insights into the state of accessibility for online shoppers and discover untapped potential for your business.
Read the ReportCite this Post
If you found this guide helpful, feel free to share it with your team or link back to this page to help others understand the importance of website accessibility.


